Overview
If a user has a fillable PDF document and wants to use Laser App Enterprise to help auto fill the client data into it. Here are the steps of how to do that process.

Add a Custom PDF into Laser App Enterprise
To begin using your fillable forms with Laser App data and registration types please follow the instructions below.
1. Create a single directory on your computer or a network shared directory where you will store all fillable PDF form files. Rename the PDF file itself to a descriptive name (this is what appears from the Laser App menu).

2. Start Laser App and from Custom PDFs in the main menu click Add/Configure/Modify.
This menu is also disabled on un-activated or expired copies of Laser App Enterprise.

3. At the top of the PDF interface screen click the Show Fields button.
4. Browse to the PDF file, select it, and then click Open.
You should see field names inserted into each text field within the form.
5. Print the form or have it open on the screen in Acrobat.

6. With the form in hand or on the screen, return to the PDF Form Interface screen (see step 2) and click the Add New PDF button.
7. Open the PDF file from step 3 (make sure it’s in the directory you want).
You should now see the configuration screen.

Data fields available in Laser App are shown on the left side of the configuration screen while text fields contained in the PDF form are shown on the right side of the screen.
8. To begin pairing fields, select them from both sides of the screen with your mouse.
9. Once a Laser App and equivalent PDF form field are selected, use the arrow buttons in the middle of the screen to insert or remove the pairing.
10. By default, the registration type is Individual, so you should start by pairing fields that will be appropriate if the form is being used for the primary client contact or an individual person.
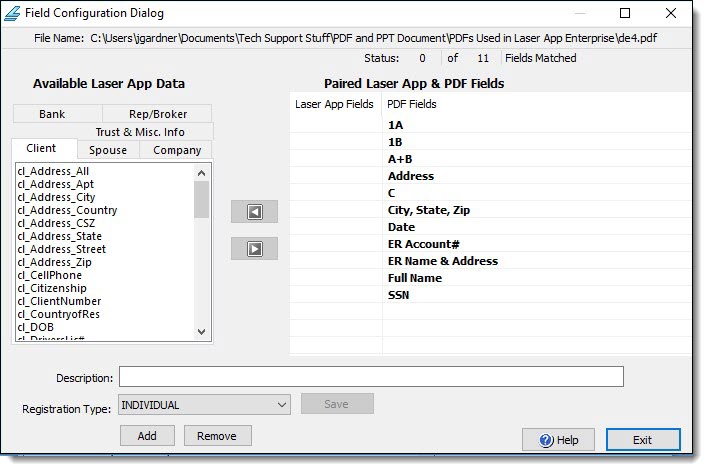
11. Type a description for the configuration and click Save.
This creates a single Individual registration type.
12. To create additional registration types click the Add button.
For example, if you choose Spouse, you would want to replace the current field pairings used in Individual with the equivalent Spouse fields from the Laser App Spouse tab.
13. When you click Save again this registration type will be added.
14. When all the needed registration types are created, click Exit to return to the main interface screen.