Overview
The Screen Designer is a tool accessed over the internet that allows a Business Analyst create screens and collect requirements at the same time. Business Analysts drag and drop fields to build these screens from a predefined set of controls. They can then set Rules and Properties for the Screens and Fields using a standardized set. Changes can be added and Screens can be previewed at any time.
Benefits of having the Screen Designer available online are: always working with the latest version of the Designer, all your changes are stored online and can be accessed from any computer with an internet connection.
How to Access the Screen Designer?
Maestro is accessed via the Admin Pipe URL. There are 2 versions of Admin Pipe – UAT and PROD.
Admin Pipe PROD: https://adminpipe.ipipeline.com
Admin Pipe UAT: https://sd-uat.ipipeline.com/suppliers
The PROD version of Maestro is where you will be doing your active project work. The contents in the Admin Pipe UAT version of Maestro is a copy of the PROD Admin Pipe environment and any work done there would be overwritten daily. This is merely a sandbox environment.
To obtain access to Maestro, email Ramya Shankar and Matthew Cain. Please specify the name of the carrier you’d like access to.

1. Select Administration – Click on the Administration option to expand the list of options*
2. Open Screen Designer – Click on the iGO Screen Designer option to access the designer.
Screen Designer Overview
The first screen presented to the user is the ‘Supplier’ dashboard. This displays all available Suppliers* a user can access.


Screen Designer Product Dashboard
The Screen Designer dashboard lists all products with iGOScreenDesigner turned on in AdminPipe. From this screen, the following actions can take place.

1. List Manager – Click the hyperlink to access the List Manager – Create and update drop-down lists.
2. Validation Expressions – Click the hyperlink to access the Validation Expressions Manager – Create and update pattern validations that can be applied to controls.
3. Template Manager – Click the hyperlink to access the Template Manager – Update templates that can be added into project screens.
4. Select a Product – Click a product to open the tab – the tab displays latest active versions of that product.
5. Open a Version – Click the hyperlink of the latest product version to open
Managing Versions
Toggle to variables and roles to see other attributes.


Click the “+” icon to create a new variable.
Type a name for the variable into the Variable Name field and select a type (Textbox, Numberbox, or Date) from the Type dropdown.

You can delete a variable by clicking the “trash” icon.
If the variable has rule dependencies, a warning message displays to confirm the deletion.
Custom variables can be selected when configuring fields in the screen designer

Click the “+” icon to create a new variable.
Type a name for the variable into the Variable Name field and select a type (Textbox, Numberbox, or Date) from the Type dropdown.
You can delete a variable by clicking the “trash” icon.
If the variable has rule dependencies, a warning message displays to confirm the deletion.
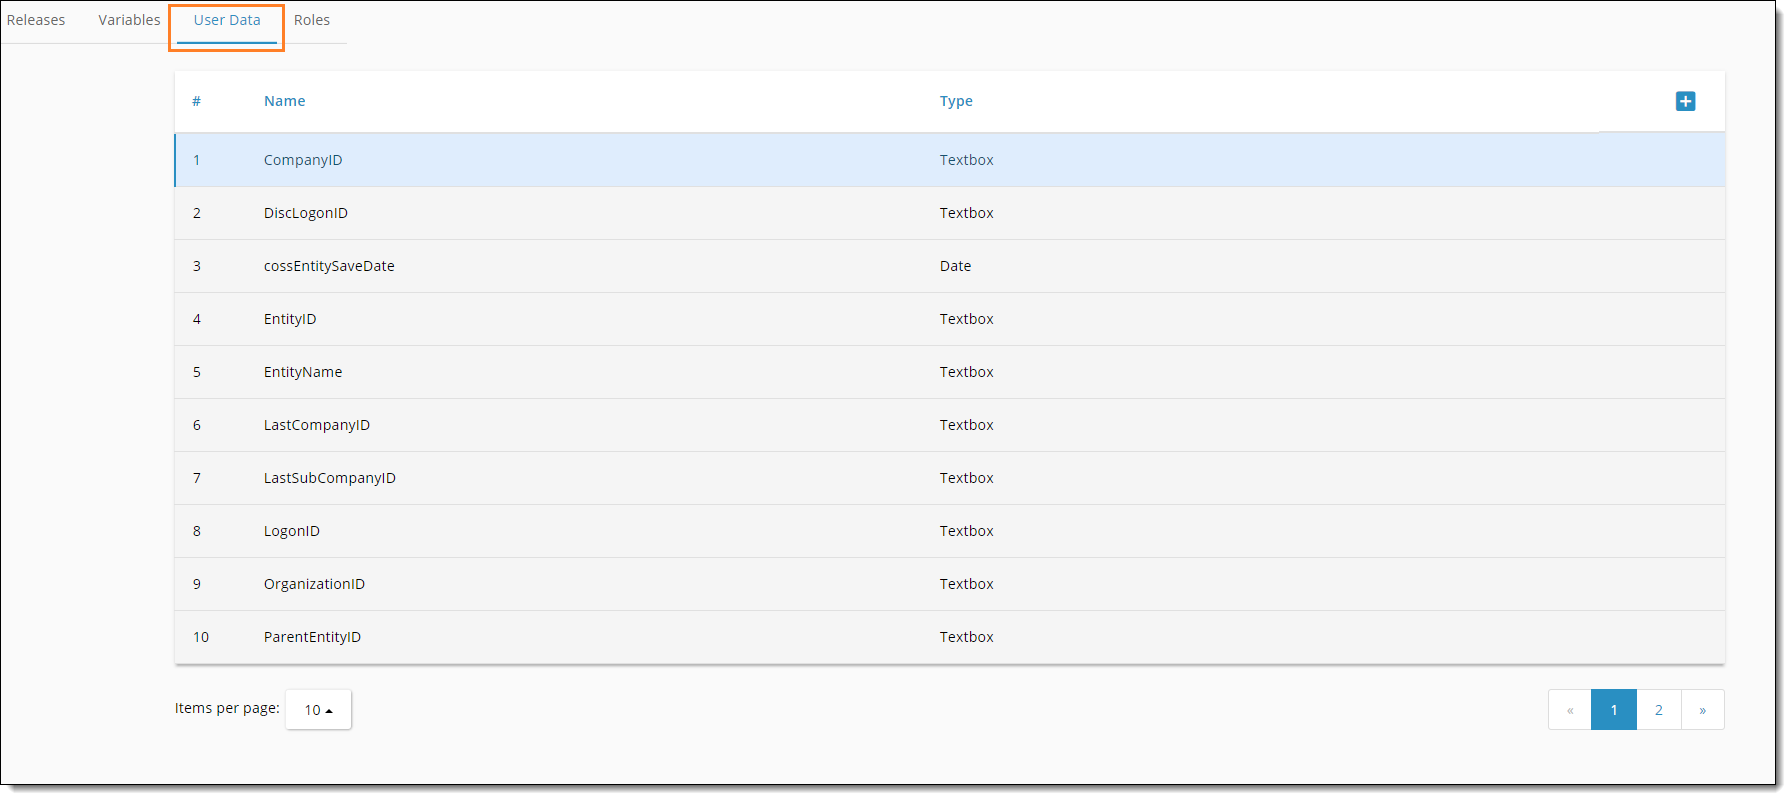
User Data variables can be selected when configuring fields in the screen designer
The user is able to edit Role name and Index description via inline editing. “Agent” role with index “99” is hardcoded. User cannot delete or edit.
The user is able to create a new Role from the “+” icon. If the Role or Index already exists the system will notify the user. Role name and Index are require fields.
Index range is [1-98].
When the user clicks the “Save” button, the new Role appears in the Roles tab. And user is able to use this Role in action “send_email” and condition “check_role”.

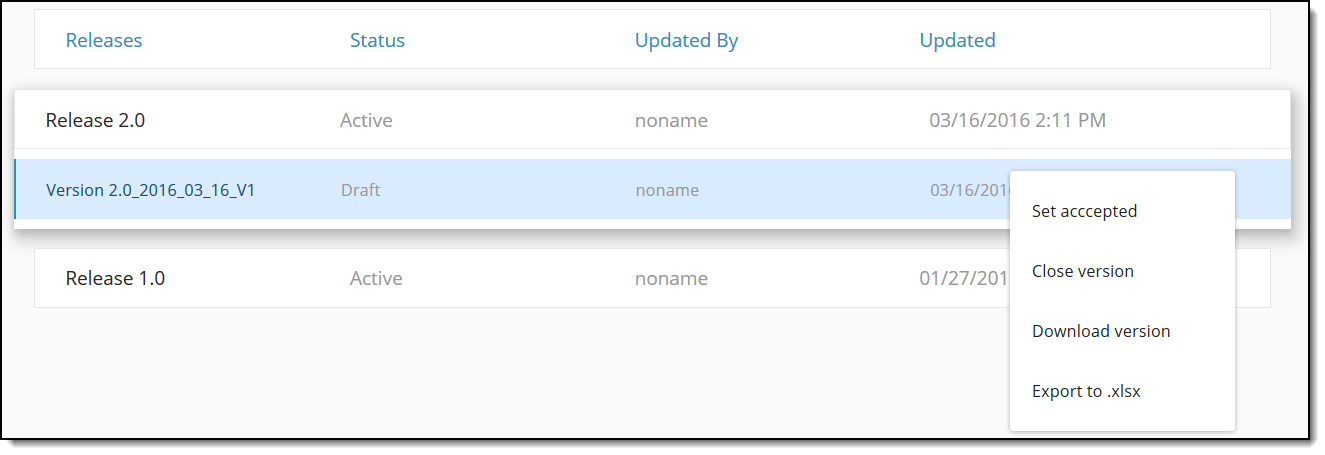
a. Options for a version in “Draft” status
- Set accepted
- Close version
- Download version
- Export to .xlsx
b. Options for a version in “Accepted” Status
- Duplicate version
- Create new release
- Close version
- Download version
- Export to .xlsx – Data can be exported from Screen Designer to a worksheet. Application populates worksheet w exporting data to specific cells. List of “Other properties” put in one cell (width, tooltip, offset, mask, defauky val and etc). In addition in the column “Other properties” name of value list for Dropdown and Radio Button control is displayed. Validation expressio displayed for added controls in format like this: validation_expression = { “E-mail”: “^\w+@\w+.\w+$”.}
Screens Dashboard
Once you select a product, all screens for that product display in a list (broken out by application screens and clickwrap screens)
All Screens dedicated to the Project are presented in the List View and sorted by the date they were updated.
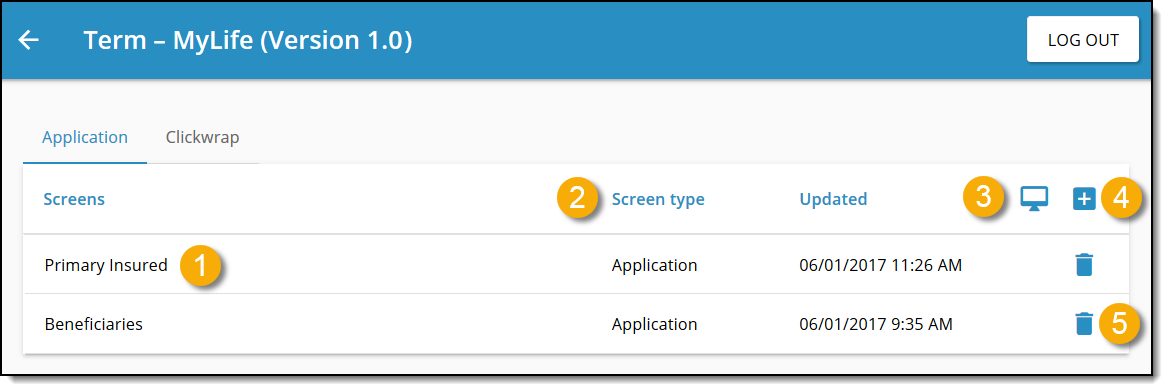

The following screen type options are available. The screen type can be defined during the initial screen setup or edited at any time by adjusting the field.
- Application – screen will be used only in runtime.
- ClickWrap – screen will be used in clickwrap signature process.
- Shared – screen will be used in runtime and clickwrap signature process.

Click the computer button in the top right to see a preview of the application with completed screens.
Similarly to the main Product Screens dashboard, Application and Clickwrap tabs display to toggle between.

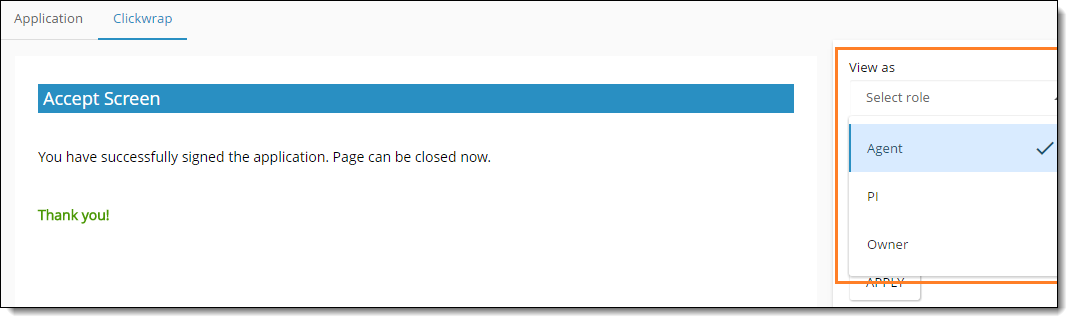
ClickWrap Role Emulator
Role Emulator is only available for the ClickWrap tab. By navigating to the Version Preview mode, you can choose from a “View as” dropdown. Roles that display as options in this dropdown are configured within the Roles tab of the version manager.
When a role is selected, the corresponding screens and fields displayed.
This content is restricted to registered users. iPipeline customers can login or register below. Please allow up to 24 hours for your account to be approved.